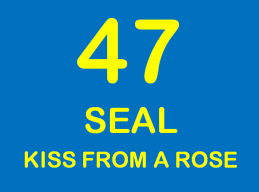
A few days ago, I was at a TOP-100 party, where the dj’s played their 100 most favorite songs. The venue had a few large screens, that showed the number, the artist and the title of each song.
It looked like this:

Whenever the next song started, the new number, artist and title would appear, using some standard PowerPoint-like animation (wipes, blinds, checkerboard, …).
Trying to build something myself seemed like a nice opportunity to experiment with Adobe AIR and jQuery.
- Adobe AIR is a framework to build rich Internet applications that run on the desktop.
- jQuery is a “fast, concise, JavaScript Library that simplifies how you traverse HTML documents, handle events, perform animations, and add Ajax interactions to your web pages”.
I am a heavy DreamWeaver user, so I had downloaded the Adobe AIR extension for Dreamweaver before. I had worked through the “Hello World” Getting Started demo successfully, but I hadn’t gone further with AIR yet, as I did not have a good experiment in mind. This TOP-100 app would change that.
The first step was to create an AIR application that would simply display the 3 elements on a screen: a number, an artist and a title.
The first step is to create a Site in DreamWeaver. I created the site “Top100” and a new file “step1.html” in it. I added the 3 elements and used some CSS to make it look like the example. This is the code:
<html xmlns="http://www.w3.org/1999/xhtml">
<head>
<meta http-equiv="Content-Type" content="text/html; charset=utf-8" />
<title>Top 100: step 1</title>
<style type="text/css">
body, p {
    font-family:"Arial Rounded MT Bold", "Arial", sans-serif;
    font-size: 24px;
    color: #FFFF00;
    background-color: #3366FF;
    margin: 0;
    padding: 0;
    text-align: center;
}
#number {
    font-size: 12em;
    margin-top: 5px;
    margin-bottom: 10px;
}
#artist {
    font-size: 6em;
    margin-top: 5px;
    margin-bottom: 5px;
}
#title {
    font-size: 4em;
    margin-top: 10px;
    margin-bottom: 5px;
}
</style>
</head>
<body>
<p>
<div id="number">47</div>
<div id="artist">SEAL</div>
<div id="title">KISS FROM A ROSE</div>
</p>
</body>
</html>
The result in a browser was:

which looked pretty much like I wanted it.
The next step was to make this screen show in an AIR application. I will explain how that went in part 2.
♦ Related files: step1.html
