Auto Publish in XP Mode stopped working

I am a big fan of the XP mode in Windows 7. A.o. it allows me to verify websites that I maintain in IE6, even side-by-side to IE8.

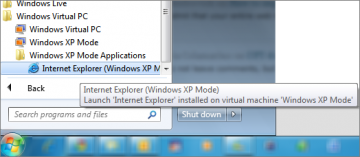
One nice feature is that you can have XP applications appear in the Start Menu of Windows 7, with “Auto Publish“. If Enabled in the XP Mode Settings, any shortcut you add to the All Users Start Menu in XP Mode, will appear in the Windows 7 Start Menu under Windows Virtual PC > Windows XP Mode Applications:

Yesterday however, I noticed that the shortcut for IE6 that I had there, no longer worked. I removed the shortcut in the Start Menu of All Users in XP Mode and added it again, but that did not help. In fact, anything I added to the All Users Start Menu no longer appeared in the Start Menu of Windows 7.
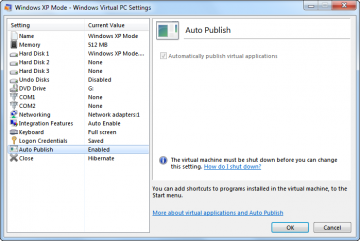
When I checked the Settings of XP Mode, Auto Publish was grayed out, with an obscure error message about not having the latest updates. After a lot of trouble-shooting, without avail, I finally uninstalled XP Mode (via Windows 7’s Control Panel > Programs and features) and reinstalled it. That brought back the Auto Publish feature:

I have no clue about what went wrong, but I have a working IE6 shortcut in my Windows 7 Start Menu again.
Unable to enable Wireless Adapter in Windows 7? blame Kaspersky

I recently encountered a pretty frustrating problem: on a laptop with Windows 7 installed, I could not enable the Wireless Adapter.

It was pretty weird: in Device Manager, everything looked good: the device was “working properly”. Yet I did not see any wireless networks. In Control Panel\Network and Internet\Network Connections, I noticed that the Wireless Adapter was disabled. I could right-click on it and select ‘Enable’, but that did not change the status: the Adapter stayed disabled.

Network Diagnostics reported there was an “unknown” problem with it. Not very helpful. I googled for hours, tried all kinds of things (disable/uninstall-reinstall/tried older versions of the driver/…) until finally I found this post which gave me a hint: apparently, Kaspersky anti-virus was the culprit! The Kaspersky NDIS filter caused the issue.

Process to solve it:

  1. Right-click the Wireless Adapter in Control Panel\Network and Internet\Network Connections, select Properties
  2. UNcheck Kaspersky Anti-Virus NDIS filter
  3. Select the Wireless Adapter, click Diagnose this device – to reset the adapter

Et voila, I (finally) had a working wireless connection again.

Bootable USB stick with Windows 7 Installation Files

A few months ago, I received the nice HP Mini 2140 netbook. It’s a pretty neat machine that has proven to be very useful, particularly on vacation.

I installed Windows 7 RC on it, from a USB DVD-drive and I’m very happy with it. However, a few days ago, the machine refused to boot. The culprit was Acronis True Image. That backup package contains a Startup Recovery Manager that is supposed to “Boot your computer after a failure to start the recovery process simply by selecting the F11 key, even if your operating system has failed.” Unfortunately, after activating that, my system become unbootable, i.e. just the opposite of what it was supposed to do. The boot sector was corrupt (*).

I eventually got it all working again by using the System Recovery Options on the Windows 7 Install disk. But I wondered “What should I have done when I had been on vacation, without access to a USB DVD-drive?”. I wanted to have the Windows Installation files on a USB stick, that I would be able to boot from in case of disaster.

There are a lot of guides on the net that describe how to make a USB stick bootable but none of them seemed easy and straightforward. Eventually I found WinToFlash, a tool  to transfer your Windows XP, Windows 2003, Windows Vista or Windows 7 setup from CD or DVD to flash memory in just a few mouse clicks.

The tool worked fine, except that after using it on a 4GB USB stick, my netbook still refused to boot from it. All the needed files were on the stick, including the bootmgr file, but somehow the stick still wasn’t bootable. I had to use the bootsect program from the Windows 7 Installation disk to make it bootable. Assuming D: is the DVD with the Installation disk and E: the USB-stick, use the following commands.

d:
cd boot
bootsect /nt60 e:

With that, my USB stick now is bootable with the installation files and recovery options for Windows 7.

Thanks to jkOnTheRun.com where I found a reference to WinToFlash.

(*) Note: I know that Acronis True Image is not (yet) supporting Windows 7, so I guess I can’t blame Acronis, but still it was highly ennoying.