Bootable USB stick with Windows 7 Installation Files

A few months ago, I received the nice HP Mini 2140 netbook. It’s a pretty neat machine that has proven to be very useful, particularly on vacation.

I installed Windows 7 RC on it, from a USB DVD-drive and I’m very happy with it. However, a few days ago, the machine refused to boot. The culprit was Acronis True Image. That backup package contains a Startup Recovery Manager that is supposed to “Boot your computer after a failure to start the recovery process simply by selecting the F11 key, even if your operating system has failed.” Unfortunately, after activating that, my system become unbootable, i.e. just the opposite of what it was supposed to do. The boot sector was corrupt (*).

I eventually got it all working again by using the System Recovery Options on the Windows 7 Install disk. But I wondered “What should I have done when I had been on vacation, without access to a USB DVD-drive?”. I wanted to have the Windows Installation files on a USB stick, that I would be able to boot from in case of disaster.

There are a lot of guides on the net that describe how to make a USB stick bootable but none of them seemed easy and straightforward. Eventually I found WinToFlash, a tool  to transfer your Windows XP, Windows 2003, Windows Vista or Windows 7 setup from CD or DVD to flash memory in just a few mouse clicks.

The tool worked fine, except that after using it on a 4GB USB stick, my netbook still refused to boot from it. All the needed files were on the stick, including the bootmgr file, but somehow the stick still wasn’t bootable. I had to use the bootsect program from the Windows 7 Installation disk to make it bootable. Assuming D: is the DVD with the Installation disk and E: the USB-stick, use the following commands.

d:
cd boot
bootsect /nt60 e:

With that, my USB stick now is bootable with the installation files and recovery options for Windows 7.

Thanks to jkOnTheRun.com where I found a reference to WinToFlash.

(*) Note: I know that Acronis True Image is not (yet) supporting Windows 7, so I guess I can’t blame Acronis, but still it was highly ennoying.
How to implement Facebook Connect on a PHP website

With 250 million users worldwide, Facebook can’t be ignored. If you have a website where users can log on to, Facebook Connect can help getting your usage numbers increased. Facebook Connect allows for an easy way for users to log on to your site.

A simple Facebook Connect button button will allow the user to log on to your site with their Facebook credentials. They don’t have to register, choose and remember a password, click on a confirm link, … The advantages seem to be clear.

Adding Facebook Connect to your website is not that hard, as a lot of information can be found at http://developers.facebook.com/connect.php. But there are some missing pieces to make it really easy if you have a website running PHP. So let me try to fill in the gaps.

The main steps can be found at http://wiki.developers.facebook.com/index.php/Connect/Setting_Up_Your_Site:

  1. Create an application with the Facebook Developer application. This will provide you with an Facebook Platform API key.
    Follow steps 1-9 and note your public API key and a secret code.
  2. Download the Facebook PHP Client Library from http://wiki.developers.facebook.com/index.php/PHP.
  3. Upload all files in the /php folder to a folder on your webserver:
    • facebookapi_php5_restlib.php, facebook.php, facebook_desktop.php
    • all files in the /php/jsonwrapper subfolder

To use the API in your php-pages, you need to create a new Facebook object with your public AND secret API key:

require_once("../functions/facebook.php");
$facebook = new Facebook('public_key','secret_code');
$fbid = $facebook->user;

$facebook->user is the facebook userid. If this is empty, the user has not yet logged in. You can get show a Facebook login button by using some XFBML-code:

if (!$fbid)
  { ?>
    <p>Log in with your facebook-account:
    <fb:login-button onlogin='window.location="redirect-page";'>
    </fb:login-button>
    </p>
   <? }

For this to work, you need to set up your site. Follow steps 1-5 for the XFBML code to work.

If the facebook userid is not empty, you can get information about the user with the users_getInfo method:

else
  {
    $user_details = $facebook->api_client->users_getInfo($fbid, 'first_name,
pic_square');
    if ( isset($user_details) )
      { ?>
	<p><? if ( $user_details[0]['pic_square'] != '' )
               { ?>
                 <img src="<?=$user_details[0]['pic_square']?>" />
            <? } ?>
           Hello <?=$user_details[0]['first_name']?>, you are logged on
via Facebook.</p>
           <p><a href="#"
onclick="FB.Connect.logoutAndRedirect('/connect/logged_out.php')">log out</a></p>
    <? }
  }

Useful tools: OnTop

A feature I’d like to see built-in into Windows is the ability to force a window to stay on top of other windows. I was disappointed to notice that even Windows Vista does not have that option.

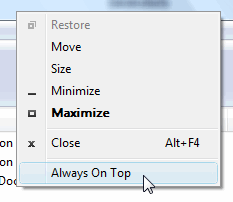
A simple, small tool to do this, is Ontop. It adds an option to the menu that appears when you right-click on an window title bar:

The tool was developed by PlanetScott for Windows 95, 98 and 2000, but it runs fine on Vista as well. The author’s website now is empty.

Many thanks to Abdussamad’s Webspace, where I found the first reference to this tool.

Download: OnTop 1.0 (zip, 21KB)