Finding the Wireless Network Setup Wizard in Windows Vista

Windows XP (SP2 and above) has an easy way to add computers or devices (like a wireless printer) to a wireless network. Once you have 1 computer connecting successfully to the wireless network, go to the Control Panel and click the Wireless Network Setup Wizard.

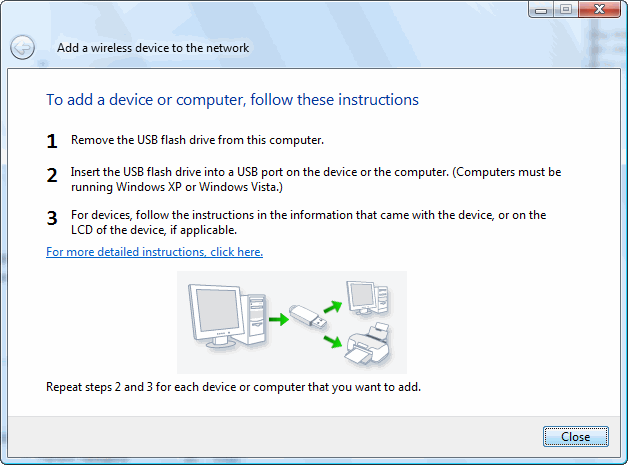
The wizard will guide you through a series of steps which will save all necessary settings on a USB-stick. You can then simply insert the stick into another computer or device that you want to connect to the same network, and the wireless settings will be transferred automatically.

When I switched to Windows Vista, I could not find back that wizard. The Windows Help nor Google brought any relief. I finally gave up and entered the security settings manually.

Today, I had to connect a new Vista machine to the network and I really wanted to find an easy way to get that working. After all, the wizard was working great in XP, so I could not believe it was ditched in Vista. After long searching, I finally discovered where the Wizard sits:

  • Click the Start button, select Network.
  • Click Add a wireless device. The button may be “hidden” if your window is small (that’s the main reason why I didn’t find it in the first place).
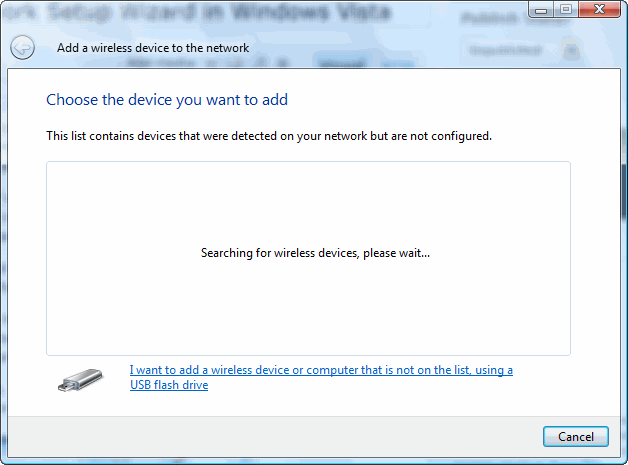
  • In the dialog box that appears, click I want to add a wireless device or computer that is not on the list, using a USB flash drive
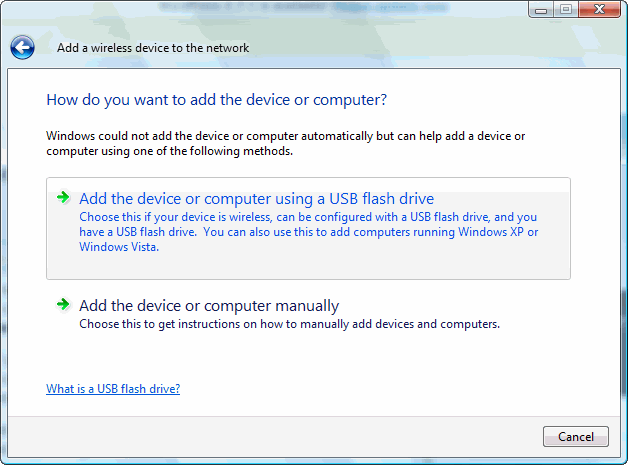
  • Click the first option: Add the device or computer using a USB flash drive
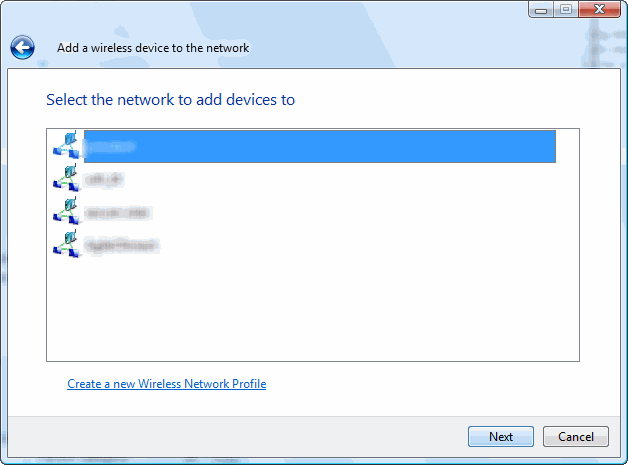
  • This will start the wizard. First it will ask which wireless network to use:
  • Then it will ask to plug a USB stick into the computer and select it:
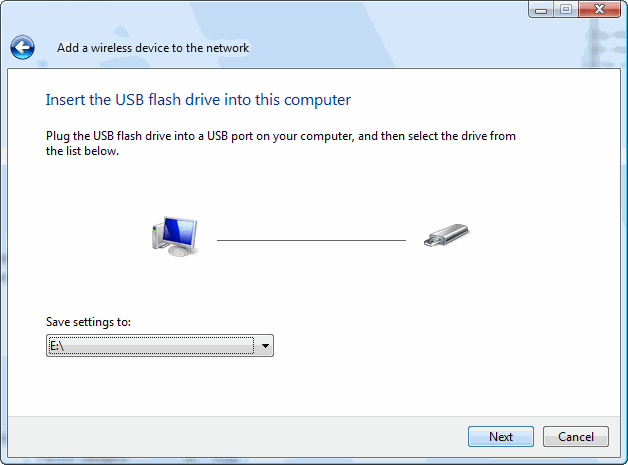
  • This will save the settings on the stick. You can now use it to connect other computers or devices to the wireless network.
Putting my own wiki on my server

The internet contains a wealth of information and can be very useful when you’re searching for something, while programming, or debugging, or fixing a problem.

But some things I seem to be looking up regularly, like the numbers of characters you can store in a TEXT field in MySQL – I can never remember whether I need a TEXT or MEDIUMTEXT data type. On other occasions, the information is hard to find and if you finally get to it, you can bookmark the page, only to find out a few months later that the page no longer exists. I wanted to know which buttons to press on a HP Deskjet 6980 to do a cartridge realignment. It took a while to find that information, so I wanted to store that somewhere.

Basically, I needed my own wiki, to be able to quickly note down things that I probably would need in the future. A bit to my surprise, setting one up was extremely simple. At http://www.mediawiki.org/wiki/MediaWiki, you can find all you need to set up MediaWiki, the free software wiki package originally written for Wikipedia.

Just following the installation instructions, I was able to set it up in minutes. You can check it out at http://www.krisgielen.be/wiki

I pretty much used the standard configuration. These are the custom settings that I added to LocalSettings.php:

// no anonymous editing, creating of pages or creating of talks
$wgGroupPermissions['*']['edit'] = false;
$wgGroupPermissions['*']['createpage'] = false;
$wgGroupPermissions['*']['createtalk'] = false;  
// users that want to edit, need to confirm their email address first
$wgEmailConfirmToEdit = true;
// replaced the logo with a logo of my own
$wgLogo = '/mediawiki/wikilogo.png';

I also wanted to get some usage statistics, so I added the Google Analytics extension.

Experimenting with Adobe AIR and jQuery – Part 7

In Step 7 of my Top100-application, I wanted to be able to enter a number and press ENTER, to immediately go to that specific number in the list. This is very similar to the ability in PowerPoint to move to a specific slide by just typing the slide number and pressing ENTER in Slide Show mode.

That piece was pretty easy with jQuery:

var newnumber = ''; // string to store numbers typed on keyboard
$(document).keyup(function(e) {
  if ( (e.keyCode>=48) && (e.keyCode<=57) )
    {
    // numbers (0..9)
    newnumber = newnumber+(e.keyCode-48);
    }
switch ( e.keyCode ) {
 case 13: // ENTER
  // switch to newnumber (if newnumber is number <= 100)
  var n = parseInt(newnumber);
  if ( (n>0) && (n<=100) )
    {
    currentnumber = n;
    // same effect as down-key
    $("#mainp").hide("slide", { direction: "left" }, 1500, function(){
      colornumber = currentnumber % bgcolors.length;
      $("#mainp").css("background-color",bgcolors[colornumber]);
      $("#mainp").css("color",textcolors[colornumber]);
      $("#number").text(currentnumber);
      $("#artist").text(lijst.record[numbers[currentnumber]]['artist'].toUpperCase());
      $("#title").text(lijst.record[numbers[currentnumber]]['title'].toUpperCase());
      $("#mainp").show("slide", { direction: "right" }, 1500, function(){
        $("#number").effect("pulsate", { times:5 }, 1500);
        });
      });
    }
  newnumber = '';
  break;

This worked, but only when using the numbers at the top of the keyboard. From the Keyboard Events page on Javascript Madness I learned that the keyCodes for the numbers on the numeric keypad are different (well, in IE, FireFox, Safari and Chrome, not in Opera): pressing the 1 key at the top results in keyCode 49, pressing 1 on the numeric keypad results in 97. So I had to add another series of keyCodes (96..105).
Also, I noted that when I started with a 0, I did not get the result I expected. Typing 055 ENTER resulted in number 45 being shown. After looking at Converting Javascript strings to numbers at the Javascript FAQ website, I realized the 0 at the start makes Javascript interpret it as an octal. So I included some code for that as well:

if ( (e.keyCode>=48) && (e.keyCode<=57) )
    {
    // numbers (0..9)
    if ( !((e.keyCode==48) && (newnumber == '')) )
      // don't start with 0 --> will be interpreted as octal
      {
      newnumber = newnumber+(e.keyCode-48);
      }
    }
  else if ( (e.keyCode>=96) && (e.keyCode<=105) )
    {
    // numbers (0..9) on numeric keypad
    if ( !((e.keyCode==96) && (newnumber == '')) )
      // don't start with 0 --> will be interpreted as octal
      {
      newnumber = newnumber+(e.keyCode-96);
      }
    }

The final addition I made was support for the BACKSPACE key. If you accidentally typed the wrong number, pressing BACKSPACE would erase all input:

switch ( e.keyCode ) {
...
  case 8: // backspace
    // reset newnumber
    newnumber = '';
    break;

♦ Related files: step7.html